How To Start A Successful Blog In 2022 (Step By Step)
Disclosure: This post may contain affiliate links and I may receive a commission if you purchase through them.
Looking for an easy-to-follow guide on how to start a successful blog in 2022? I got you.
If you’re on the fence of starting a blog, now’s the right time to start one. Starting a blog can seem really overwhelming, especially if you don’t know where to start.
This easy, step-by-step guide will teach you how to create a blog that will set you up for success and potentially make money from, even if you have absolutely no experience with blogging.
The goal of this guide is by the end of it, you’ll have published your own blog! Just imagine the possibilities of where you could take your blog if you just start.
When I started my first blog (which was way back then), I was completely lost and overwhelmed. And when I get overwhelmed, I procrastinate and that’s exactly what I did with blogging. Even though I wanted to start, I just never really did anything to move forward.
I would then spend hours and hours researching how to start a blog and would get stuck on figuring out my niche, my blog name, etc.
Well, I’m here to help you and save you LOADS of time starting a blog. I don’t want you to go through the same hurdles as me. Rather, I want to provide you practical, action steps that will hopefully prevent you from getting stuck and start that blog of yours!
Learn how to create a blog in less than an hour following these steps:
What is a blog?
A blog is a website that consists of articles, blog posts, and any information really. It’s kind of like an online journal, depending on the purpose of your blog.
A blog is a website that consists of articles, blog posts, and any information that is shared with others.
Some people use blogs as an online journal to share their lives with others and connect. Other people use blogs as a way to start a business, sell products, or connect with their target audience.
If you didn’t know you could make money from blogging, you certainly can! This guide is specifically meant to teach you how to start a successful blog with this kind of mindset.
What are the benefits of starting a blog?
There are many benefits to starting a blog, aside from earning an income, getting comments on your blog posts, or gaining an audience. These are benefits that I personally have come across from starting a blog that has made me enjoy the process a lot more.
- You have the potential to help other people with their needs by sharing what you know or have learned about a certain topic.
- You can learn so much about what you’re blogging about because writing blog posts will require research and inspiration. By doing so, you’ll become more knowledgeable in what you’re blogging about.
- If you optimize your blog posts well, you have the possibility for your website to rank well on Google search, which will bring traffic to your blog.
- Blogging makes you feel like you are your own boss, even when you’re just starting out. You’re in control of what you write, your writing style, how you monetize your blog, etc.
How to get started with a blog
This is probably the first most essential step to starting your blog: choosing a blogging platform.
There are two different types of blogging platforms:
Hosted
A hosted platform such as WordPress.com or Blogger are free blogging websites. The downside of these platforms is that they are owned by Google, so Google owns your website. This means that they can shut down your website anytime they see fit.
I don’t know about you but that scares me. That’s why even though these websites are free, I’d rather go the safe route and pay a little more to have my own website. This leads me to another blogging platform…
Self-Hosted
WordPress.org is a self-hosted blogging platform. WordPress.org is used bymany successful bloggers and is highly recommend as the standard in the blogging industry.
A huge benefit to using this blogging platform is that it’s super easy to use, contains many themes you can choose from, and helpful plugins to support your blog. I highly recommend choosing this platform. WordPress.org is also the blogging platform I use!
You don’t have to install or register for an account through WordPress.org if you choose a WordPress hosting platform (which I will get to later). You don’t have to do anything yet – I simply just wanted to let you know what the difference between a hosted vs. self-hosted blogging platform.
Main point: If you do want to make money from you blog, you need to have a self-hosted website. I have good news for you! Self-hosting is super affordable. You can get a self-hosted WordPress website through Bluehost for as little as $2.95 per month through my link!
Tips on how to start a successful blog in 2022
Step 1: Pick a blog name (aka your domain name)
A domain name is basically the name of your blog. Choosing a blog name can be quite the challenge, BUT do not get stuck on this step. I definitely spent a good month or so literally just on this step. I do NOT want that for you (lol). So here are some practical tips to help you get unstuck choosing a blog name:
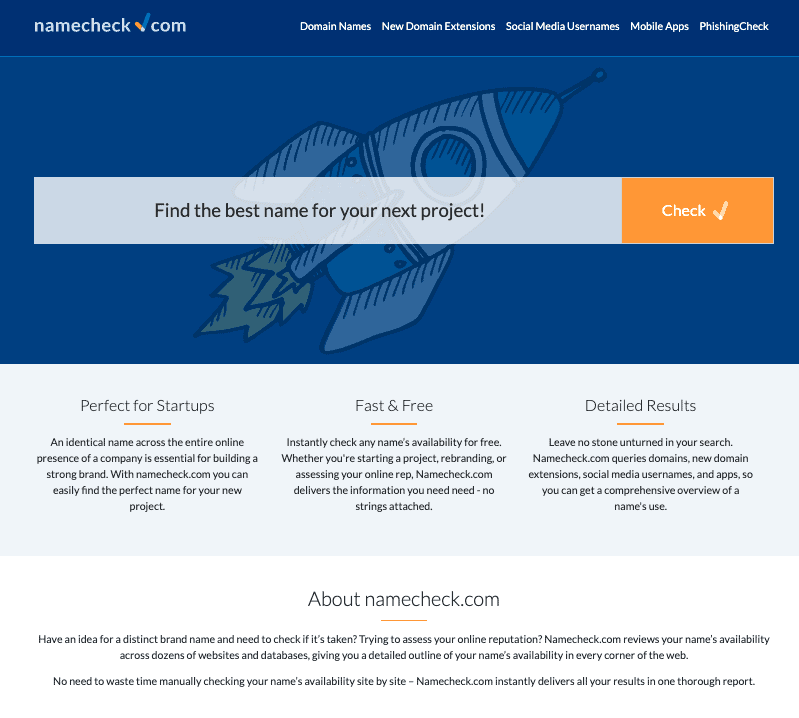
- Use the website namecheck.com to see if the blog name you want is available. Keep trying!
- I highly recommend using a “.com” domain if possible. It’s a more standard domain for your blog and it will easier for other people to remember your website name.
- Try to avoid numbers, hyphens, or periods in your domain name. You want to make it as easy as possible for people to remember your domain.
- Your name could also be your blog name if it’s not taken already. Sadly, mine is already taken (haha) but nonetheless, I love my blog name.
If you’re still stuck, know that your blog name doesn’t have to be perfect.
An average domain name is better than no domain name.
Google
Step 2: Choose a blog host
In this step, I will show you how to setup blog hosting and understand the WordPress dashboard.
If you are looking to invest time into your blog as a business, you’ll also have to consider investing a bit of money. You will need to purchase a blog host.
A blog host is basically where your blog “lives” meaning all your important files from your blog are stored here.
Many blogs will recommend many different blog host platforms. I felt so overwhelmed by which one to choose, but to save you time, I’d highly recommend Bluehost. It’s the one I use and let me just say that their customer service is top-notch.
If you ever run into any troubles with your blog, Bluehost’s customer service has got your back.
Here are the following steps to get started using Bluehost:
Click here to go to Bluehost and then click the Host Your Site button.
1. Click the ‘Host Your Site’ button.

2. Choose the plan you would like.
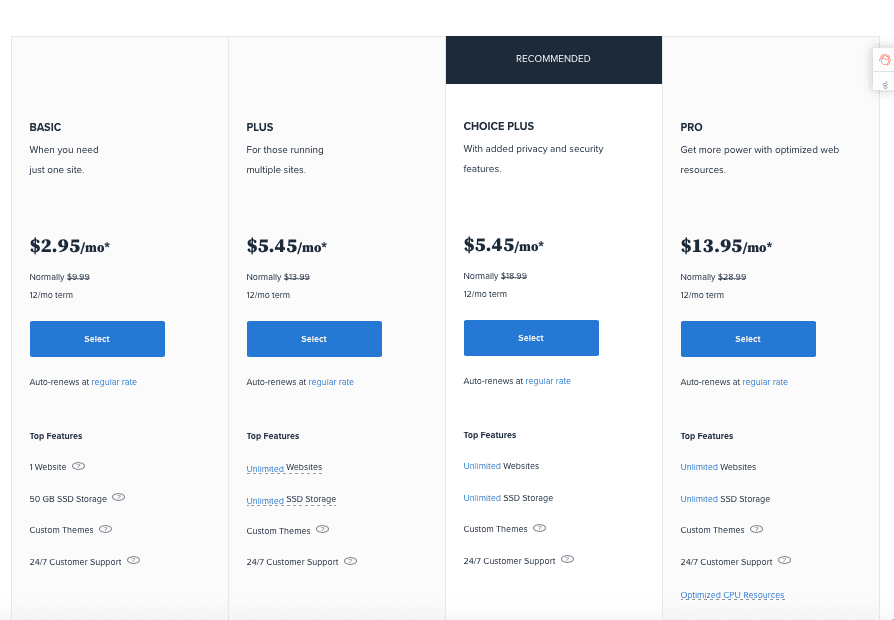
I’d recommend choosing the Basic plan if you’re just starting out! And if you need to upgrade to a different plan, you can always do so in the future.
Remember that all Bluehost plans come with a FREE domain name for the first year + a free SSL certificate.
3. Choose a domain name.
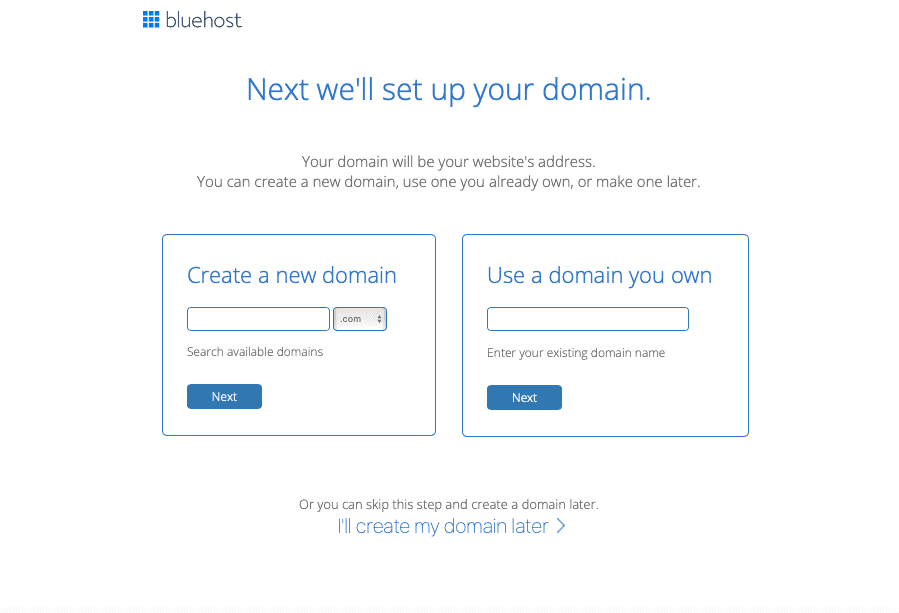
Remember not to get to stuck on this part. You can also select the choice on the bottom ‘I’ll create my domain later.’
But if you do know what you want your domain name to be, type it in and select ‘next’ to see if it’s available.
4. Create your account
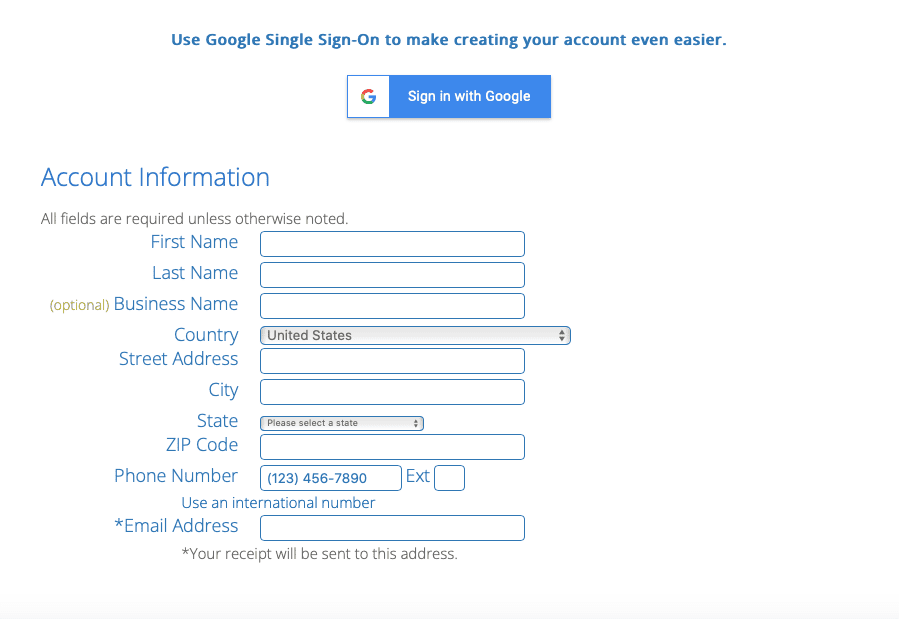
In this step, you’re going to fill out your personal information. It’s pretty straight forward – just make sure you type in the correct email address so that you can get your login details afterwards.
5. Fill out package information
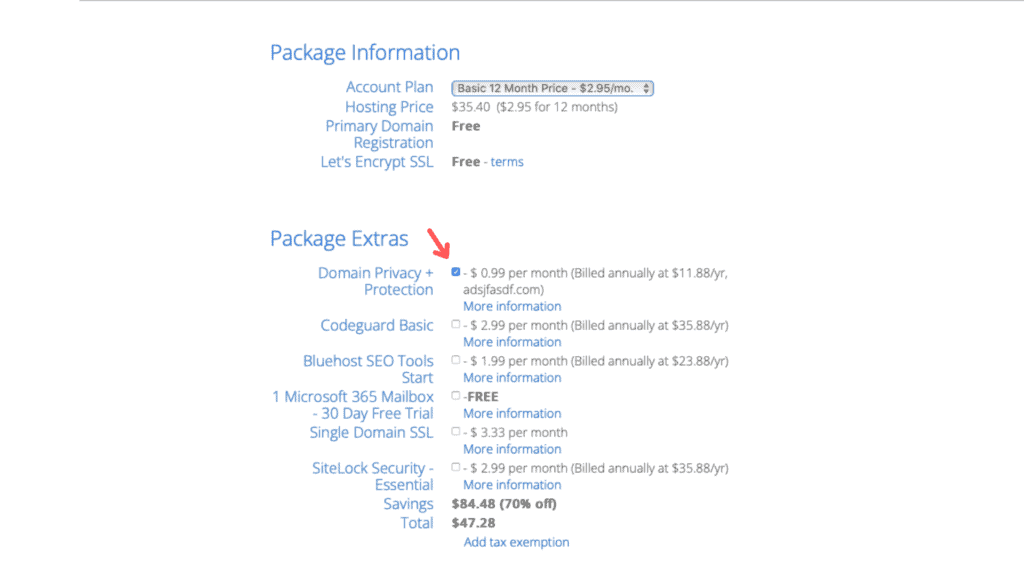
In this step, you’ll have to decide whether or not you want the Basic 12 Month plan ($2.95/month) or the Basic 36 Month plan ($4.95/month), which is not shown above.
I’m currently using the Basic 12 Month Plan, but to be honest, I would have chosen the 36-month plan. If you do the math, the 36-month plan will be a total of $178.20 for the first 3 years. The 12-month plan is $35.40 for the first year, but will become $119.88/year the following years.
So you end up saving a lot of money choosing the 36-month plan in the long run.
For the package extras, I recommend unchecking everything, except the “domain privacy + protection” part. This helps keep your name and address private and not stored in the WHOIS database.
Once you’re done, click the Submit button.
6. Create your password.
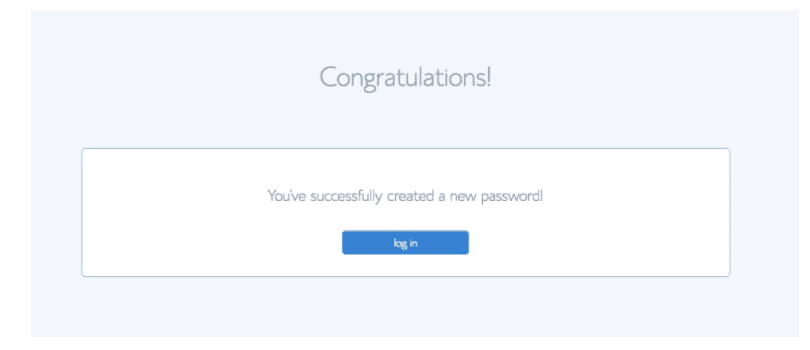
Once you’ve created your password, you’ve successfully created your WordPress blog! Congratulations, friend!
So when you click the log in button, Bluehost will recommend some free themes that you can choose from. But I’d say just pick any that you deem fit and don’t get overwhelmed about choosing the right one.
Step 3: Customize your blog
To customize your blog theme, go to Appearance > Themes. There are many free WordPress themes you can choose from.
If there’s something I wish I had done differently starting my blog, it would be investing in a customized blog theme. I spent many, many hours trying to design my website and I was not satisfied (lol).
I could have saved so much of my time doing something else like writing my blog posts, if I had invested earlier in a blog theme.
My blog theme for my website is from pixandhue.com and I am absolutely in LOVE with how it looks. It was super easy to install the theme and their step-by-step tutorials are so clear and concise to customize my website.
Yes, it definitely was an investment for me to purchase this blog theme, but was it worth it? HECK YES.
I’ve saved myself so much time and energy just by purchasing a blog theme.
Step 4: Install helpful plugins
Plugins are important for your blog because they have help to improve and optimize your site to be shown in search engines, increase your website speed, and customize your blog to your liking.
To start off with your blog, I’d highly recommend these important plugins:
- Rank Math SEO: provides many SEO tools and helps multiply your incoming traffic in the easiest way possible
- Kadence Blocks: helps you easily customize your website by adding custom column layouts, backgrounds, dual buttons, icons etc.
- Smush: helps reduce image file sizes, improve performance and boost your SEO
- Weblizar Pin It Button On Image Hover And Post: provides facility to pins your blog posts, pages and images into your Pinterest account boards
- Antispam Bee: helps with effective day to day comment and trackback spam-fighting
- Google Analytics for WordPress by MonsterInsights: allows you to analyze and track how many visitors find and follow your website
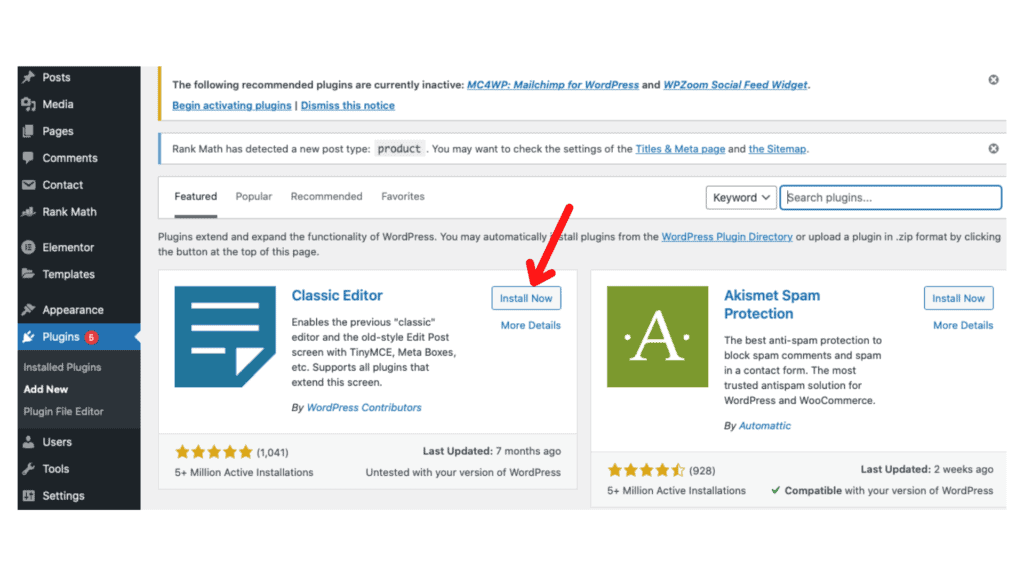
To install a plugin, go to Plugins (which is right under Appearance). Next, click on Add New.
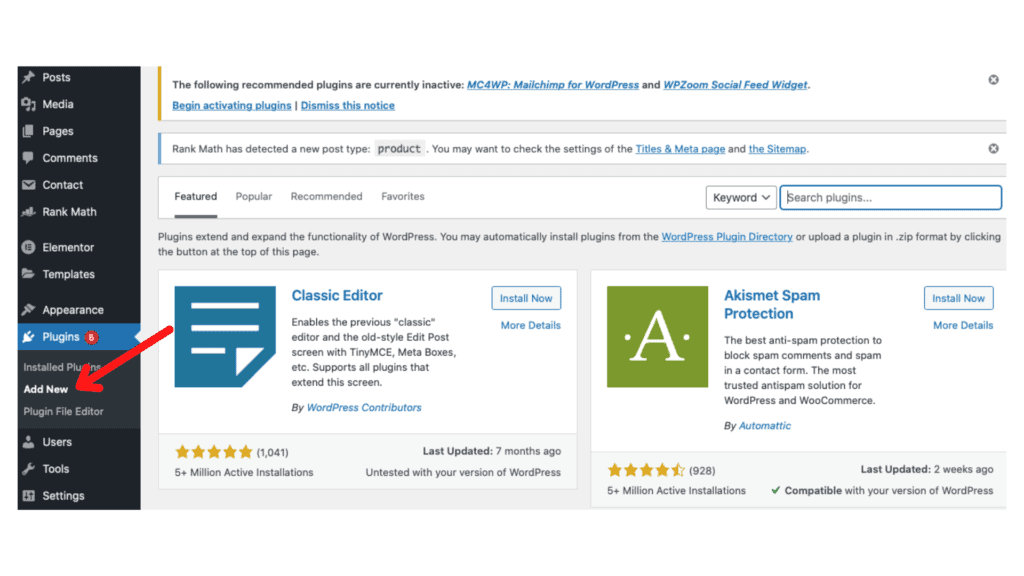
At the right side of the page, you’ll see a search bar that says Search plugins. That’s where you’ll search for the plugins you want to add.
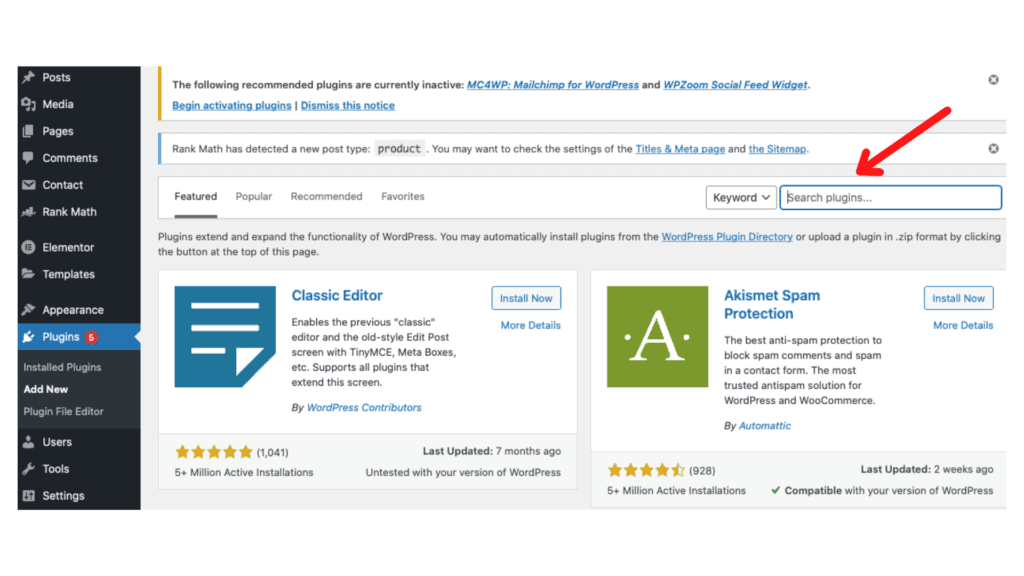
After you search for the plugin you want, click Install Now and then select Activate.
Step 5: Write your first blog post
Yay! So once you’ve installed the necessary plugins, it’s time to start writing your first blog post! I like to think of blog posts as the foundation of your blog. After all, a blog wouldn’t be a blog without any information that tells your audience what it’s all about!
Writing your first blog post can be exciting, yet intimidating. You may be wondering what on earth to write about or who you should even be writing to.
If you need any guidance, here is my first blog post I wrote on She Be Thriving. The post was really short and brief, but I honestly needed to just start and not overthink it.
To create your first blog post, go to Posts > Add New.
Here a few helpful tips to get started writing your first few blog posts:
- Do some research: if you are struggling to decide on a niche, do some research and brainstorm 3-5 topics that you would be interested in writing about.
- Outline your blog posts – This tip helps me save a lot of time and stress. Mondays are when I outline my blog posts, so for the rest of the week, I’m just writing and editing my blog posts.
- Use headlines that are compelling: Helpful plugins like Rank Math SEO or Yoast SEO help you to write compelling headlines that grab your audience’s attention.
- Break up your paragraphs: I used to write super long paragraphs and now I realize it’s best to keep it short and brief to make it easier for your audience to read. I’d say add a break after every 2-3 sentences!
- Add images in your content: I’m a visual person, so I love seeing images in blog posts. Otherwise, I’ll kind of get bored halfway reading through a words-only post. Use free stock photo websites like Unsplash or Instant Images to upload images onto your posts!
Step 6: Promote your blog
Once you created a good amount of blog posts (I’d say about 5-10 blog posts), it’s time to start promoting your blog!
Don’t get too caught up in having to make your blog look perfect before promoting. If you simply have a few blog posts that are helpful for your audience and answer their needs then you’re moving in the right direction.
Here a few helpful strategies to promote your blog:
- Pinterest: Most bloggers, if not all, use Pinterest as a way to promote their website. I’d recommend starting off with Pinterest because it is the easiest, fastest way to reach your audience compared to other social media outlets.
- Join a Facebook blogging community: Search up any blogging FB groups that allow you to promote your blog. Joining a FB community also helps you to connect with other bloggers. Be mindful of certain rules for Facebook groups.
- Connect with 3-5 bloggers in your niche: Do you have any bloggers in mind that you look up to or get inspired by? I’d recommend connecting with them by commenting on their posts. Leave a genuine comment and eventually, these bloggers will start to notice you and appreciate your continued support.
Step 7: Make money from your blog
To start monetizing your blog, I’d recommend getting Google AdSense to earn income through ad revenue. Other ways you can monetize your blog include:
- Affiliate links: You can promote products on your website by providing links. If a viewer clicks on a product you recommend on your website through the link, you can earn a commission from the purchase. I’d recommend Amazon Affiliates program to start off.
- Sponsored posts: You can team up or collaborate with a brand or company and get paid to promote their products.
- Digital products: You can create your own digital products and sell them on your website. These products can look like ebooks, planners, printables, courses, or paid webinars.
I personally only use affiliate links right now, so maybe in the future, I’ll continue to diversify my blog income strategies.
Congratulations on your new blog and writing your first blog post! If you found this post helpful, I’d appreciate if you could some love by commenting or sharing this post!






One Comment
Comments are closed.